Car Window Tinting Process Explained
A clean tint job looks effortless from the outside. What most drivers do not see is how much of the car window tinting process comes down to prep, precision, and patience. If you want tint that looks sharp, blocks heat, and lasts, the process matters just as much as the film.
Why the car window tinting process matters
Window tint is not just a style upgrade, even though it absolutely changes the look of a vehicle. Done right, it helps cut glare, reduce interior heat, add privacy, and protect the cabin from UV exposure. Done poorly, it can leave you with peeling edges, trapped dust, purple fading, or a back glass full of bubbles that never really settle.
That is why professional installation is about more than sticking film on glass. A quality shop treats tint like a finish product. The goal is a clean, consistent result that matches the vehicle, the driver, and local legal limits.
Step 1: Choosing the right film before installation starts
The first part of the job happens before any glass gets cleaned. Film selection affects appearance, heat rejection, signal compatibility, and price. If you are tinting a daily driver in South Florida, the conversation usually goes beyond how dark you want the windows. Heat control matters just as much.
Dyed film is often the budget entry point. It improves appearance and helps with glare, but it usually does less for heat rejection and can fade faster over time. Carbon film is a stronger upgrade because it offers better heat performance and a rich finish without the metallic look. Ceramic film is the premium option for drivers who want strong heat rejection, UV protection, and high-end performance without interfering with electronics.
This is where good guidance makes a difference. The darkest film is not always the smartest choice, and the most expensive film is not automatically necessary for every vehicle. It depends on your goals, your budget, how long you plan to keep the car, and how much heat reduction you actually want.
Step 2: Inspecting the glass and vehicle condition
Before film touches the glass, the installer checks the windows closely. Older vehicles may have scratches, pitting, leftover adhesive, or defroster line damage on the rear window. Frameless windows, curved back glass, and tight gasket edges can also change how the job is approached.
This step matters because tint does not hide flaws in the glass. In many cases, it makes them more visible. A quality installer will point out issues ahead of time so expectations are clear. That is part of a professional job too.
Step 3: Deep cleaning the windows
If there is one stage that separates a clean install from a frustrating one, it is cleaning. Dust, lint, oils, pet hair, smoker residue, and old sticker adhesive all work against the film. Even a tiny contaminant can show up once the tint is laid down.
Installers clean both the glass and the surrounding areas where contamination can fall in during application. That includes window seals, edges, and interior panels near the work zone. Rear glass often takes extra attention because of the angle, defroster lines, and buildup that collects over time.
This is one reason a rushed tint job rarely looks premium. The car window tinting process is detail-heavy, and prep is where a lot of that detail lives.
Step 4: Cutting the film to fit the window
Once the glass is clean, the installer sizes the film for each window. Depending on the shop and vehicle, this may be done by hand, with software-guided plotter cuts, or with a combination of both. Precision matters here because the final fit affects both appearance and durability.
A clean cut leaves the right margin around the edges and creates a finished look without gaps that feel sloppy. On complex vehicles, especially those with tight curves or unusual rear windows, experience really shows. Good fitment is one of those things customers notice immediately, even if they cannot always explain why one tint job looks better than another.
Step 5: Heat shrinking for curved glass
Flat side windows are one thing. Rear windows are another. Most back glass has compound curves, which means the film has to be shaped before it can sit correctly. This is where heat shrinking comes in.
The installer places the film on the outside of the rear window and uses controlled heat to shrink it into the glass shape. The goal is to remove fingers, ridges, and tension points so the film can lay smoothly once installed inside. Too much heat or poor technique can damage the film. Too little control can leave distortion or creases.
This step takes skill. It is one of the clearest differences between an experienced tint specialist and somebody just trying to get through the job.
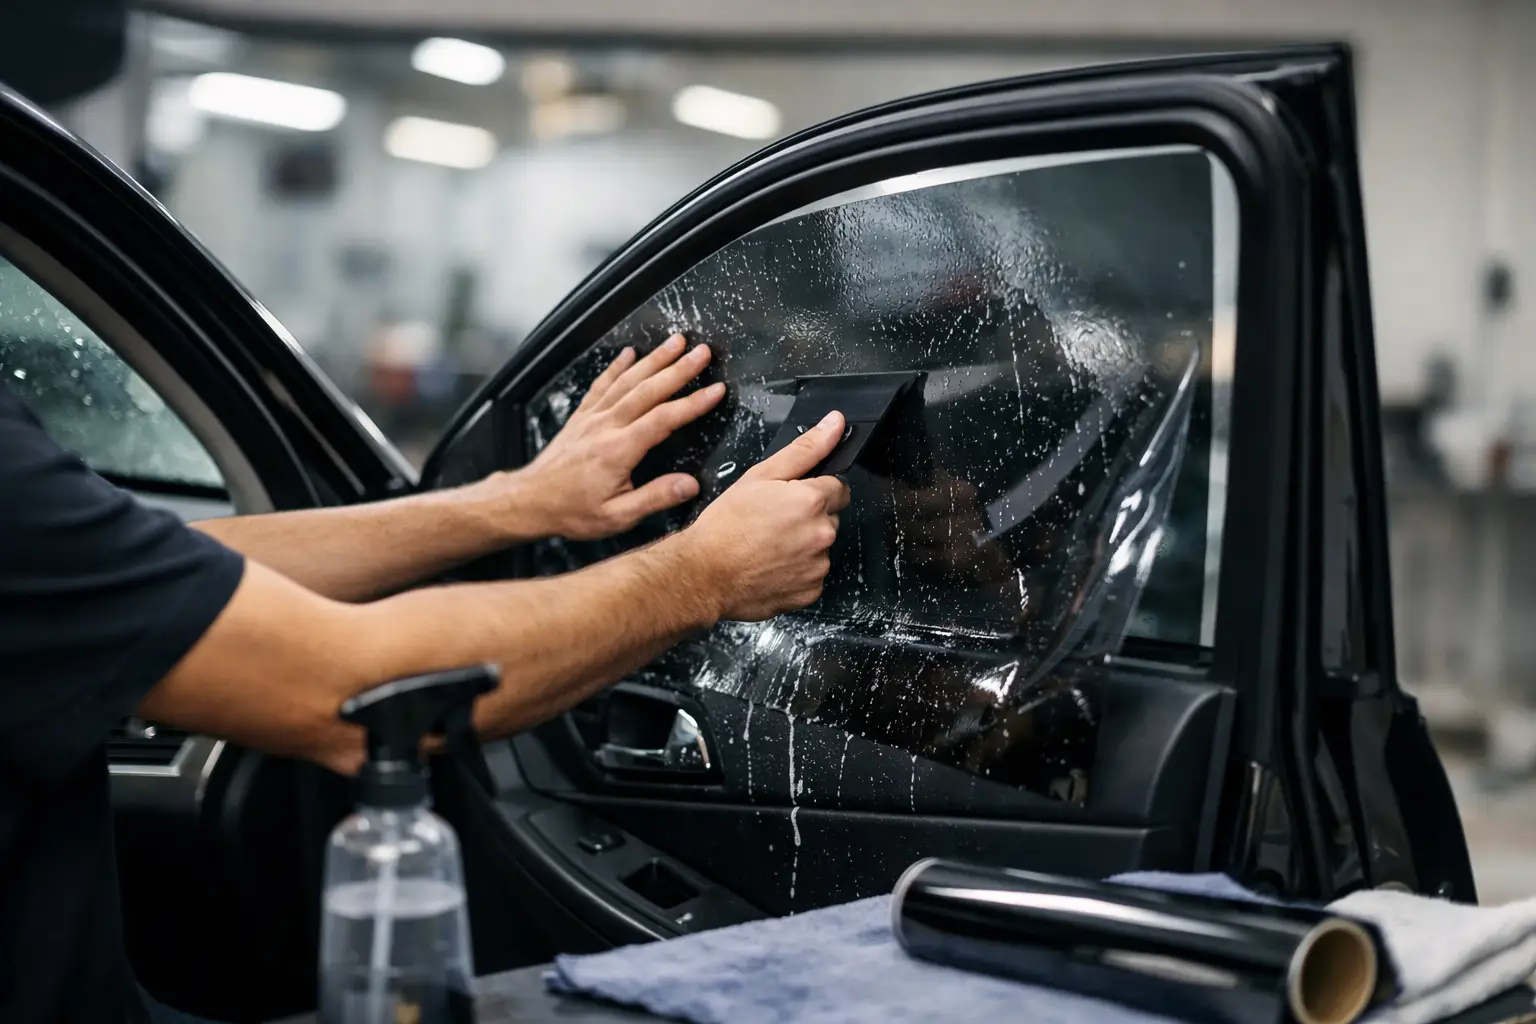
Step 6: Applying the film inside the vehicle
After cutting and shaping, the film is moved to the inside of the glass. The adhesive side is carefully handled to keep it free of contamination. The installer sprays the window with a slip solution, positions the film, and begins setting it into place.
Then comes the squeegee work. This part pushes out the water and air between the film and the glass while locking the tint into alignment. Pressure has to be controlled. The installer wants strong adhesion and a clean finish, but not at the expense of creasing the material or shifting the pattern on a difficult window.
Side windows may need extra care around seals and edges. Rear windows require patience because of defroster lines and the challenge of reaching every section evenly. When the work is done right, the film sits smooth and uniform with minimal visible contamination.
What can affect the final result
Even with a professional install, a few variables can influence the finished look. Vehicle age is one. Older cars tend to carry more glass imperfections and more debris in the seals. Window shape is another. Some luxury models, coupes, and SUVs simply take more labor because of design complexity.
Weather also plays a role, especially in curing time. Humid climates can slow the drying process, which means a freshly tinted window may look hazy or show small water pockets for a little while. That does not always mean something went wrong. In many cases, it is just part of the film settling.
The film type matters too. Higher-end films often offer better clarity, better performance, and better long-term color stability. If your priority is keeping the cabin cooler and protecting a premium interior, the upgrade is usually worth it.
Aftercare is part of the car window tinting process too
Installation does not end the moment the vehicle leaves the shop. Fresh tint needs time to cure, and that means the aftercare instructions matter. In most cases, drivers should avoid rolling windows down for several days. Cleaning should also wait until the film has fully set.
It is normal to see some moisture haze or minor water pockets during curing. That typically clears as the film dries out. What you do not want to do is press on the film, pick at the edges, or assume it needs to be redone on day one.
When it is time to clean, use tint-safe products and a soft cloth. Ammonia-based cleaners can damage certain films over time, so they are best avoided. A little care goes a long way toward keeping the finish looking sharp.
Professional installation vs. DIY kits
A lot of drivers look at DIY tint kits because the price sounds appealing. The trade-off is that tinting is one of those jobs that gets expensive fast when mistakes pile up. Contamination, crooked cuts, poor shrinking, and visible bubbles are common problems when the tools or experience are not there.
Professional installation costs more upfront, but it usually delivers better fit, cleaner edges, stronger visual consistency, and a film warranty you can actually use. That matters if you care about long-term appearance and not having to peel off a bad job six months later.
For drivers who want a customized result instead of a temporary fix, professional tint is the better move. A shop that works on everything from everyday commuters to fully upgraded builds understands how to match film performance with the look you are after.
What to expect when you book the job
Most tint appointments start with a quick consultation about shade, film type, legal limits, and vehicle layout. From there, installation time depends on the number of windows, the type of vehicle, and the complexity of the glass. A straightforward sedan is different from a large SUV or a vehicle with challenging rear glass.
If you are choosing a shop, ask about film options, warranty coverage, and how they handle edge fitment and rear window installation. Those details tell you a lot about the level of craftsmanship. At Tint Station, that hands-on approach is the whole point – building a result that looks clean, performs hard, and fits the vehicle like it should.
A great tint job should feel like an upgrade every time you get behind the wheel. Cooler cabin, cleaner look, better privacy, less glare. When the process is done right, you do not just notice the film – you notice how much better the whole vehicle feels.